Used for educational purposes or to help you if you don’t have access to a server and want to test some web pages created before uploading them to the server, with XAMPP you can create a local web server by yourself. This is a solution stack package running with Apache a Hypertext Transfer Protocol (HTTP) server, a Relational Database Management System (RDBMS) MariaDB, a PHP (Hypertext Preprocessor) programming language, and Perl. Supports Linux, Windows, Mac OS X, and Solaris (X from XAMPP indicates cross-platform software). When you finished installing XAMPP you can add some extra modules like FileZilla, Mercury, and Tomcat. I will install this package on a Windows system.
Before downloading the program we need to make some changes to the host file from C:\Windows\System32\drivers\etc, we add a 127.0.0.1 localhost line; however, if you need to use this package to run your web pages directly to the Internet, you must replace 127.0.0.1 with your IP address and localhost with the purchased domain (e.g. www.domain-name.com).
We can Download XAMPP Windows Installer from https://www.apachefriends.org/download.html and start the installation process; alternatively, you can download the portable version of the XAMPP package from https://sourceforge.net/projects/xampp/files/ or even a .7z version. I chose the latest option (e.g. xampp-windows-x64-7.3.8-2-VC15.7z) to avoid the User Account Control (UAC) warning which can be disabled if you want to install the package with Windows Installer;
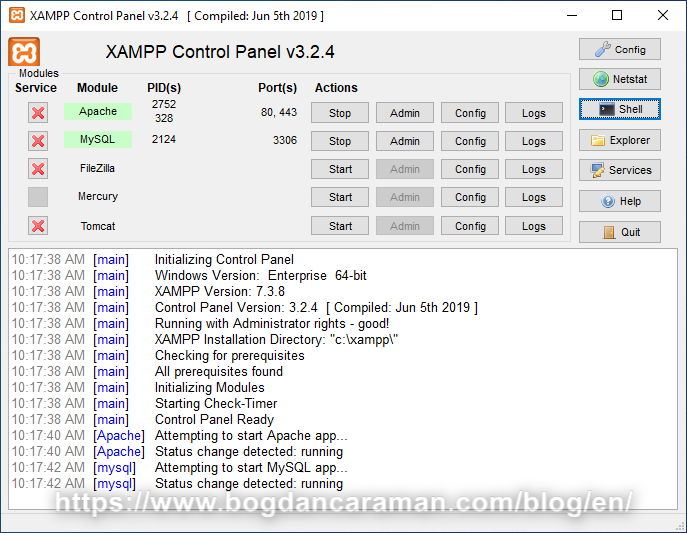
Will extract the package to C:\xampp and will run the setup_xampp.bat as a normal user for setup, then run xampp-control.exe as an administrator to run the Control Panel. Before starting some Actions like Start Apache or MySQL you can select the Services to Run after your Windows Restart, but this is optional.
If you have an older version of Skype you should go to the Tools\Options\Advanced\ and uncheck Use port 80 and 443 as alternatives for incoming connections because Apache from the XAMPP program will use that port too. Another old program that will use port 443 is VMWare Workstation Player, you will edit the httpd-ssl.conf file from C:\ xampp\apache\conf \ and replace 443 with 4430. There are two changes:
...#Listen 0.0.0.0:443#Listen [::]:443Listen 4430...ServerName localhost:4430
From your favorite browser type localhost and learn from the local guides HOW-TO to change the password for MySQL. So, to Reset the MySQL/MariaDB Root Password will use mysqladmin command-line utility from XAMPP Control Panel\Shell
mysqladmin --user=root password "newpassword"
After the password was changed phpMyAdmin will not recognize it so I add “newpassword” to the C:\xampp\phpMyAdmin\config.inc.php
/* Authentication type and info */$cfg['Servers'][$i]['auth_type'] = 'config';$cfg['Servers'][$i]['user'] = 'root';$cfg['Servers'][$i]['password'] = 'newpassword';$cfg['Servers'][$i]['extension'] = 'mysqli';$cfg['Servers'][$i]['AllowNoPassword'] = true;$cfg['Lang'] = '';
Will now change the httpd-vhosts.conf file from the C:\ xampp\apache\ conf\extra\ folder, meaning that will tell our server where the pages will be run, but this is only if you run web pages on the Internet and not from the localhost, so leave the file unchanged for localhost. I will not delete anything from the file, there are some examples and I will insert the code for the two web pages, for example, site1 and site2:
NameVirtualHost *:80
<VirtualHost *:80>ServerName localhostDocumentRoot "C:/xampp/htdocs"<Directory "C:/xampp/htdocs">Options IncludesNoExecAllowOverride AllOrder allow,denyAllow from all</Directory></VirtualHost>
<VirtualHost *:80>ServerName site1DocumentRoot "C:/xampp/htdocs/site1"<Directory "C:/xampp/htdocs/site1">Options Indexes +FollowSymLinks Includes ExecCGIAllowOverride AllOrder allow,denyAllow from all</Directory></VirtualHost>
<VirtualHost *:80>ServerName site2DocumentRoot "C:/xampp/htdocs/site2"<Directory "C:/xampp/htdocs/site2">Options Indexes +FollowSymLinks Includes ExecCGIAllowOverride AllOrder allow,denyAllow from all</Directory></VirtualHost>
You can also customize it by the example from the file, the commented one. After saving the file is good to reset the Apache from XAMPP Control Panel with Stop and Start.
Create site1 and site2 folders to C:\ xampp\htdocs and then create index.php test file with the following code:
for site1\index.php
<?phpPrint "Hello, SITE 1!";?>
for site2\index.php
<?phpPrint "Hello, SITE 2!";?>
From your favorite browser type http://localhost/site1/and then http://localhost/site2/ to receive the “Hello” message.
You can now test your web pages created using those folders or create new ones, but be sure to change httpd-vhosts.conf and create other folders if you need to run the web pages on the Internet.
You can find the latest version of XAMPP at https://www.apachefriends.org/index.html through the Download menu.